Caffeine
前置知识
高并发在开发中属于一个核心话题,其中有一个极为重要的技术项,那就是缓存。
缓存可以减少数据库数据的查询压力,但缓存是一个庞大的话题,并不是说在整个的项目之中整一个内存或者是分布式的缓存就可以解决的问题。
和ORM框架(MyBatis等)之中的缓存相比:
- ORM框架几乎都支持缓存操作,但这些缓存都是在数据层上的缓存,键(key)通常是查询的SQL语句以及参数的组合,而值(value)是查询结果返回的Java对象,粒度比较粗。
- 而本文介绍的缓存更多的是业务层面上的缓存,用法更加灵活
和Redis的缓存相比:
- Caffeine是单机版本的缓存组件,而Redis将数据放在其它服务器上,属于分布式的缓存组件
- 本地缓存多用来存储一些固定不变的热点数据,或精度要求不是很高的数据,例如视频弹幕等;而分布式缓存多用来存储会发生变化的热点数据,例如用户每日签到的日期记录。
简单介绍
官网:caffeine
Caffeine 是一个用于 Java 的高性能缓存库,它提供了灵活、高性能的缓存实现。
核心的两大顶级接口:Cache和AsyncCache,分别定义了同步缓存和异步缓存。
在Caffeine官方文档的代码示例中,我们可以了解到在组件中应该使用Caffeine工具类来获取Cache接口的对象实例。
简单测试:
1
2
3
4
5
6
7
8
9
10
| public static void main(String[] args) throws Exception {
Cache<String, Integer> cache = Caffeine.newBuilder()
.maximumSize(2)
.expireAfterAccess(3L, TimeUnit.SECONDS)
.build();
cache.put("test1", 15);
log.info("过期前,{}", cache.getIfPresent("test1"));
TimeUnit.SECONDS.sleep(5);
log.info("过期后,{}", cache.getIfPresent("test1"));
}
|
所有缓存数据都是保存在内存中的,为了防止内存溢出导致应用程序崩溃,所以所有的缓存组件都提供了缓存数据的清理
为了避免出现空指针的情况,组件提供了数据失效梳理的控制:
1
2
3
4
5
6
7
8
9
10
| public static void main(String[] args) throws Exception {
Cache<String, Integer> cache = Caffeine.newBuilder().maximumSize(2).expireAfterAccess(3L, TimeUnit.SECONDS).build();
cache.put("test1", 15);
log.info("过期前,{}", cache.getIfPresent("test1"));
TimeUnit.SECONDS.sleep(5);
log.info("过期后数据失效处理,{}", cache.get("test1", (k) -> {
return 18;
}));
}
|
LoadingCache
LoadingCache是Cache的一个子接口,可以在声明缓存时搭配默认的缓存刷新方法。
1
2
3
4
5
6
7
8
9
10
11
12
13
14
15
| public static void main(String[] args) throws Exception {
LoadingCache<String, Integer> cache = Caffeine.newBuilder().maximumSize(2).expireAfterAccess(3L, TimeUnit.SECONDS).build((k) -> {
log.info("LoadingCache数据加载。。。");
return 100;
});
cache.put("test1", 15);
cache.put("test2", 18);
log.info("过期前,{}", cache.getIfPresent("test1"));
TimeUnit.SECONDS.sleep(5);
log.info("过期后数据失效处理,{}", cache.get("test1", (k) -> {
return 18;
}));
log.info("过期后数据失效处理,{}", cache.get("test2"));
}
|
注意:版本为2.9.3;在较低版本中,需要先调用getAll()方法才能正常刷新数据
AsyncLoadingCache
异步数据加载操作:
1
2
3
4
5
6
7
8
9
10
11
12
13
14
15
16
17
18
19
20
21
22
23
24
25
| public static void main(String[] args) throws Exception {
log.info("线程名{}", Thread.currentThread().getName());
AsyncLoadingCache<String, Integer> cache = Caffeine.newBuilder().maximumSize(2).expireAfterAccess(3L, TimeUnit.SECONDS).buildAsync(new AsyncCacheLoader<String, Integer>() {
@Override
public @NonNull CompletableFuture<Integer> asyncLoad(@NonNull String s, @NonNull Executor executor) {
CompletableFuture<Integer> completableFuture = CompletableFuture.supplyAsync(() -> {
log.info("线程名{}", Thread.currentThread().getName());
return 180;
});
return completableFuture;
}
});
cache.put("test1", CompletableFuture.completedFuture(15));
cache.put("test2", CompletableFuture.completedFuture(18));
log.info("过期前,{}", cache.get("test1").get());
TimeUnit.SECONDS.sleep(5);
log.info("过期后数据失效处理,{}", cache.get("test1", (k) -> {
log.info("线程名{}", Thread.currentThread().getName());
return 18;
}).get());
log.info("过期后数据失效处理,{}", cache.get("test2").get());
}
|
项目实战
Caffeine和SpringBoot的版本之间是有对应关系的,好在spring-boot-dependencies包中指定了Caffeine的版本,不需要我们再去找兼容版本。
依赖:
1
2
3
4
5
| <dependency>
<groupId>com.github.ben-manes.caffeine</groupId>
<artifactId>caffeine</artifactId>
</dependency>
|
自定义线程池:
1
2
3
4
5
6
7
8
9
10
11
12
13
14
15
16
17
18
19
20
21
22
23
24
25
26
27
28
29
30
31
32
33
34
35
36
37
38
39
40
41
42
43
44
45
46
47
| @Slf4j
@SpringBootConfiguration
public class MyConfig implements WebMvcConfigurer {
@Autowired
private CoursesInterceptor myInterceptor;
@Bean
public ThreadPoolTaskExecutor myExecutor() {
ThreadPoolTaskExecutor pool = new ThreadPoolTaskExecutor();
pool.setCorePoolSize(3);
pool.setMaxPoolSize(6);
pool.setQueueCapacity(10);
pool.setKeepAliveSeconds(120);
pool.setThreadNamePrefix("myThreadPool-");
pool.setRejectedExecutionHandler(new ThreadPoolExecutor.AbortPolicy());
return pool;
}
@Override
public void addInterceptors(InterceptorRegistry registry) {
registry.addInterceptor(myInterceptor).addPathPatterns("/**");
}
}
|
定义缓存
1
2
3
4
5
6
7
8
9
10
11
12
13
14
15
16
17
18
19
20
21
22
23
24
25
26
27
28
29
30
31
32
33
34
35
36
37
38
39
40
41
42
43
44
45
46
47
48
49
50
51
52
53
54
55
56
57
58
59
60
61
62
| @Data
@Slf4j
@Component
public class MyCacheUtils {
@Autowired
private CoursesMapper coursesMapper;
@Autowired
private ThreadPoolTaskExecutor myExecutor;
private LoadingCache<String, List<Courses>> courseCache;
private LoadingCache<String, List<Courses>> courseCache2;
private AsyncLoadingCache<Object, List<Courses>> asyncCourseCache;
private AsyncLoadingCache<Object, List<Courses>> asyncCourseCache2;
@PostConstruct
public void innit() {
courseCache = Caffeine.newBuilder()
.maximumSize(2)
.expireAfterAccess(3L, TimeUnit.SECONDS)
.build(k -> {
log.info("===========缓存更新============");
Thread.sleep(2000);
return coursesMapper.selectList(Wrappers.lambdaQuery(Courses.class).in(Courses::getId, 1, 2, 3, 4, 5));
});
asyncCourseCache = Caffeine.newBuilder().maximumSize(2).expireAfterAccess(3L, TimeUnit.SECONDS).executor(myExecutor).buildAsync(k -> {
log.info("===========异步缓存1更新============");
return coursesMapper.selectList(Wrappers.lambdaQuery(Courses.class).in(Courses::getId, 6, 7, 8));
});
courseCache2 = Caffeine.newBuilder()
.maximumSize(2)
.expireAfterAccess(3L, TimeUnit.SECONDS)
.build(k -> {
log.info("===========cache2缓存更新============");
return coursesMapper.selectList(Wrappers.lambdaQuery(Courses.class).in(Courses::getId, 9, 10));
});
asyncCourseCache2 = Caffeine.newBuilder().maximumSize(2).expireAfterAccess(3L, TimeUnit.SECONDS).buildAsync(new AsyncCacheLoader<Object, List<Courses>>() {
@Override
public @NonNull CompletableFuture<List<Courses>> asyncLoad(@NonNull Object o, @NonNull Executor executor) {
CompletableFuture<List<Courses>> completableFuture = CompletableFuture.supplyAsync(() -> {
return coursesMapper.selectList(Wrappers.lambdaQuery(Courses.class).in(Courses::getId, 15));
}, myExecutor);
return completableFuture;
}
});
}
}
|
当然也可以申明为final的,在构造器中初始化,这样就不需要@Data注解了
当不需要指定线程池时,刷新缓存的方法都是可以在构造器中声明的,毕竟构造器的执行在注入属性之前。
调用
1
2
3
4
5
6
7
8
9
10
11
12
13
14
15
16
17
18
19
20
21
22
23
24
25
26
| @Autowired
private MyCacheUtils myCacheUtils;
@Scheduled(cron = "0/5 * * * * ? ")
public void scheduledTest1() throws Exception {
List<Courses> courses = myCacheUtils.getCourseCache().get("test");
log.error("获取到缓存1的数据长度{}", courses.size());
List<Courses> haha = myCacheUtils.getAsyncCourseCache().get("haha").get();
log.error("获取到异步缓存1的数据长度{}", haha.size());
List<Courses> courses1 = myCacheUtils.getCourseCache2().get("courses");
log.error("获取到缓存2的数据长度{}", courses1.size());
}
@Scheduled(cron = "0/5 * * * * ? ")
public void scheduledTest2() throws Exception {
List<Courses> haha = myCacheUtils.getAsyncCourseCache().get("enen").get();
log.error("获取到异步缓存1的数据长度{}", haha.size());
List<Courses> courses1 = myCacheUtils.getCourseCache2().get("courses");
log.error("获取到缓存2的数据长度{}", courses1.size());
}
@Scheduled(cron = "0/5 * * * * ? ")
public void scheduledTest3() throws Exception {
List<Courses> xixi = myCacheUtils.getAsyncCourseCache2().get("xixi").get();
log.error("获取到异步缓存2的数据长度{}", xixi.size());
}
|
注意:不要纠结于键的值,当缓存中没有这个键或者这个键的值为空时,缓存就会执行“兜底方案”。
打印日志的线程是在主线程上的,而缓存1的刷新方案会阻塞线程,所以部分的日志会扎堆打印到控制台。
缓存数据驱逐策略
JVM的GC一般我们不会手动调用,为了防止内存溢出,Caffeine为我们提供了一些驱逐策略。
容量驱逐策略
1
2
3
4
5
6
7
8
9
10
11
12
| public static void main(String[] args) throws Exception {
Cache<String, Integer> cache = Caffeine.newBuilder().maximumSize(2).expireAfterAccess(3L, TimeUnit.SECONDS).build();
cache.put("test1", 15);
cache.put("test2", 18);
log.info("{}", cache.getIfPresent("test1"));
log.info("{}", cache.getIfPresent("test2"));
cache.put("test3", 20);
TimeUnit.MILLISECONDS.sleep(100);
log.info("{}", cache.getIfPresent("test1"));
log.info("{}", cache.getIfPresent("test2"));
log.info("{}", cache.getIfPresent("test3"));
}
|
权重驱逐策略
注意:权重和容量驱逐策略存在冲突,不能同时设置。
1
2
3
4
5
6
7
8
9
10
11
12
13
14
15
16
17
18
19
20
21
22
23
| public static void main(String[] args) throws Exception {
Cache<String, Integer> cache = Caffeine.newBuilder().maximumWeight(100).weigher((k, v) -> {
return 51;
}).expireAfterAccess(3L, TimeUnit.SECONDS).build();
cache.put("test1", 15);
TimeUnit.MILLISECONDS.sleep(100);
cache.put("test2", 18);
TimeUnit.MILLISECONDS.sleep(100);
log.info("{}", cache.getIfPresent("test1"));
log.info("{}", cache.getIfPresent("test2"));
cache.put("test3", 20);
TimeUnit.MILLISECONDS.sleep(100);
log.info("{}", cache.getIfPresent("test1"));
log.info("{}", cache.getIfPresent("test2"));
log.info("{}", cache.getIfPresent("test3"));
cache.put("test4", 22);
TimeUnit.MILLISECONDS.sleep(100);
log.info("{}", cache.getIfPresent("test1"));
log.info("{}", cache.getIfPresent("test2"));
log.info("{}", cache.getIfPresent("test3"));
log.info("{}", cache.getIfPresent("test4"));
}
|
当历史权重的积累大于设定值后,便不能继续添加数据。
当极短时间内同时插入数据,会出现覆盖的情况:
1
2
3
4
5
6
7
8
9
10
11
12
13
14
| public static void main(String[] args) throws Exception {
Cache<String, Integer> cache = Caffeine.newBuilder().maximumWeight(100).weigher((k, v) -> {
return 51;
}).expireAfterAccess(3L, TimeUnit.SECONDS).build();
cache.put("test1", 15);
cache.put("test2", 18);
cache.put("test3", 20);
cache.put("test4", 22);
log.info("{}", cache.getIfPresent("test1"));
log.info("{}", cache.getIfPresent("test2"));
log.info("{}", cache.getIfPresent("test3"));
log.info("{}", cache.getIfPresent("test4"));
}
|
时间驱逐策略
除了之前使用过的读之后开始计时,还可以设置写之后开始计时:
1
| Cache<String, Integer> cache = Caffeine.newBuilder().maximumSize(2).expireAfterWrite(3L, TimeUnit.SECONDS).build();
|
定制化驱逐策略
定制化的缓存驱逐策略可以通过Expiry接口来实现。
1
2
3
4
5
6
7
8
9
10
11
12
13
14
15
16
17
18
19
20
21
22
23
24
25
26
27
28
29
30
31
32
33
34
35
| public static void main(String[] args) throws Exception {
Cache<String, Integer> cache = Caffeine.newBuilder().initialCapacity(2).maximumSize(3)
.expireAfter(new Expiry<String, Integer>() {
@Override
public long expireAfterCreate(@NonNull String s, @NonNull Integer integer, long l) {
log.info("创建后失效计算key={}", s);
return TimeUnit.SECONDS.toNanos(5);
}
@Override
public long expireAfterUpdate(@NonNull String s, @NonNull Integer integer, long l, @NonNegative long l1) {
log.info("更新后失效计算key={}", s);
return TimeUnit.SECONDS.toNanos(1);
}
@Override
public long expireAfterRead(@NonNull String s, @NonNull Integer integer, long l, @NonNegative long l1) {
log.info("读取后失效计算key={}", s);
return TimeUnit.SECONDS.toNanos(2);
}
})
.build();
cache.put("test1", 15);
cache.put("test2", 18);
cache.put("test3", 20);
log.info("test1:{}", cache.getIfPresent("test1"));
TimeUnit.SECONDS.sleep(2);
log.info("test1:{}", cache.getIfPresent("test1"));
log.info("test2:{}", cache.getIfPresent("test2"));
cache.put("test2", 16);
TimeUnit.SECONDS.sleep(1);
log.info("test2:{}", cache.getIfPresent("test2"));
TimeUnit.SECONDS.sleep(2);
log.info("test3:{}", cache.getIfPresent("test3"));
}
|
当然,Expiry是支持函数式的接口。
只要满足设置的任何一个过期条件,数据就会自动过期。
JVM驱逐
1
2
3
4
5
6
7
8
9
10
11
12
13
14
| public static void main(String[] args) throws Exception {
Cache<String, Integer> cache = Caffeine.newBuilder().initialCapacity(2).maximumSize(3)
.weakKeys()
.weakValues()
.build();
String key = "test1";
Integer value = new Integer(18);
cache.put(key, value);
log.info("{}", cache.getIfPresent(key));
value = null;
Runtime.getRuntime().gc();
TimeUnit.MILLISECONDS.sleep(100);
log.info("{}", cache.getIfPresent(key));
}
|
知识复习:Java中的四种引用关系
- 强引用:垃圾回收器不会回收被强引用的对象
- 软引用:当内存不足时可能被回收
- 弱引用:随时可能被回收
- 虚引用:相当没有引用,无法通过引用获取对象的实例,主要用于对象被垃圾回收时收到系统通知
注意:异步缓存不支持这种GC的操作过程
缓存数据删除与监听
对于缓存数据的删除有两种方式:
- 基于自动驱逐策略的方式实现
- 使用
invalidate()方法手工删除
在进行组件设计的时候,一般都会提供数据的回调操作,Caffeine组件中也提供了一个删除监听的操作,删除数据之前可以执行一些操作。
1
2
3
4
5
6
7
8
9
10
11
12
13
14
15
| public static void main(String[] args) throws Exception {
Cache<String, Integer> cache = Caffeine.newBuilder().initialCapacity(2).maximumSize(3)
.removalListener(new RemovalListener<String, Integer>() {
@Override
public void onRemoval(@Nullable String s, @Nullable Integer integer, @NonNull RemovalCause removalCause) {
log.info("数据{}被删除,原因是{}", s, removalCause);
}
})
.build();
cache.put("test1", 18);
log.info("{}", cache.getIfPresent("test1"));
cache.invalidate("test1");
TimeUnit.MILLISECONDS.sleep(100);
log.info("{}", cache.getIfPresent("test1"));
}
|
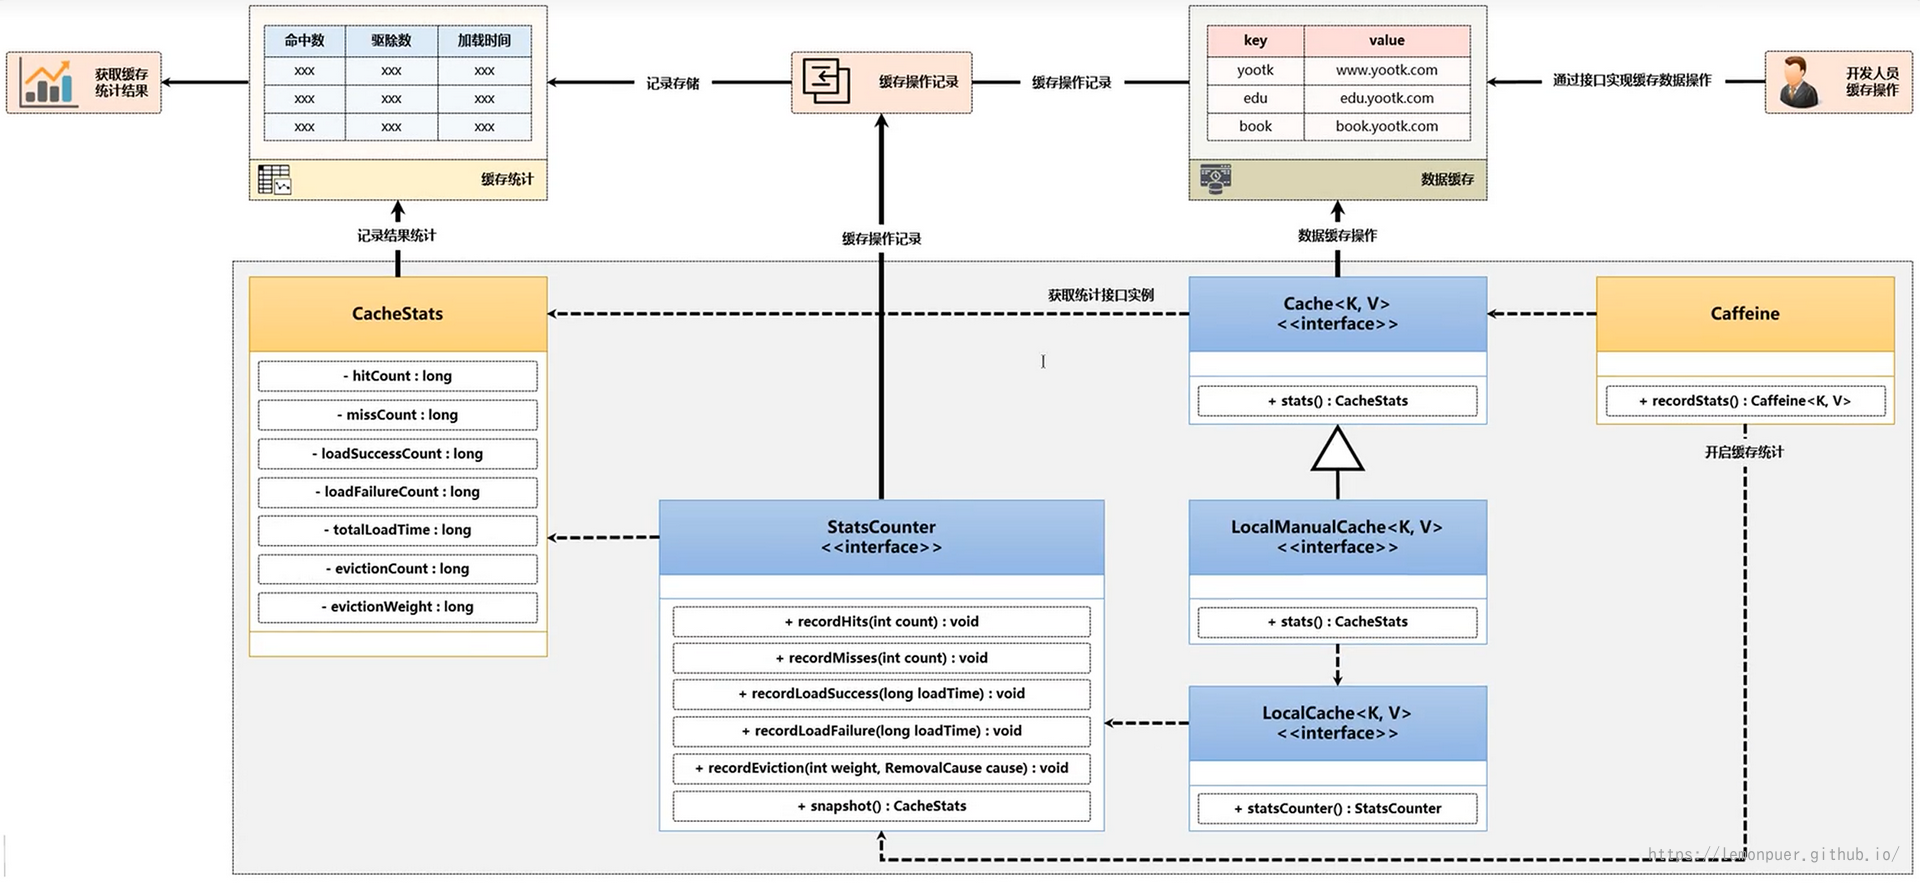
CacheStats
Caffeine开发组件有一个最为重要的特点是自带有数据的统计功能,例如:缓存查询的次数,查询成功次数,查询失败次数。
默认情况下没有开启此数据的统计信息。 如果想获取到统计数据,则需要使用到Caffeine开发类提供的处理方法。
Caffeine内部使用了一个StatsCounter的接口来实现数据信息的记录,ConcurrentStatsCouter是其实现类。
上面的接口仅仅是开启了数据统计的处理支持,但是如果想最终获取到这些统计的信息,还需要另一个方法的支持。
以下的操作结构图介绍了这些方法之间的联系:
获取缓存的操作数据
1
2
3
4
5
6
7
8
9
10
11
12
13
14
15
16
17
18
19
20
21
22
23
24
25
| public static void main(String[] args) throws Exception {
Cache<String, Integer> cache = Caffeine.newBuilder().initialCapacity(2).maximumSize(3)
.recordStats()
.removalListener(new RemovalListener<String, Integer>() {
@Override
public void onRemoval(@Nullable String s, @Nullable Integer integer, @NonNull RemovalCause removalCause) {
log.info("数据{}被删除,原因是{}", s, removalCause);
}
})
.build();
cache.put("test1", 18);
cache.put("test2", 20);
String[] strings = new String[]{"test1", "test2", "test3"};
for (int i = 0; i < 100; i++) {
new Thread(() -> {
for (String k : strings) {
log.info("获取{}:{}", k, cache.getIfPresent(k));
}
}).start();
}
TimeUnit.SECONDS.sleep(3);
CacheStats stats = cache.stats();
log.info("缓存请求次数:{}", stats.requestCount());
log.info("缓存命中次数:{}", stats.hitCount());
}
|
缓存驱逐算法
考虑数据的缓存,实际上有两点最为核心的话题:一个是缓存数据的命中率,另一个就是缓存的驱逐。
驱逐又有两点核心:一个是驱逐的算法,一个是驱逐的具体实现。
所有的缓存组件中都提供了三类缓存算法:FIFO、LRU、LFU(内部又拓展了TinyLFU和W-TinyLFU)
- FIFO(先进先出)
这是一种早期使用的缓存算法,采用队列的形式实现缓存的存储,实现的核心依据在于:较早保存在缓存中的数据有可能不会再使用,一旦缓存中的容量不足时,会通过一个指针进行队首数据的删除,以置换出新的存储空间,保存新增的缓存项。
缺页率的问题:最早存储的缓存数据一直属于热点数据,但由于队列长度的限制,可能会将这个热点数据删除,造成缓存数据丢失的问题。
容易出现缓存雪崩的情况。
- LRU(最近最久未使用)
该算法不再是依据保存时间进行数据项的清除,而是通过数据最后一次访问的时间戳来进行排查,当缓存空间已经满员时,会将最久没有访问的数据进行清除。LRU是一种常见的缓存算法,在Redis以及Memcached分布式缓存之中使用较多。
突发性的稀疏流量表现较好,即短时间内较少量但集中请求
- LFU(最近最少使用)
当缓存满时,会删除最近访问计数为0的数据,如果此时缓存中保存的数据计数全部大于1,则不会删除缓存的数据,同时也不保存新的缓存数据。
以上缓存的驱逐算法都面临一个实际的问题:某个数据当时非热点,但在某一个时刻成为了热点数据。
TinyLFU算法
使用LFU算法可以在固定的一段时间内达到较高的命中率,但是在LFU算法中需要维持缓存记录的频率信息(每次访问都要更新),会存在额外的开销。
并且由于频次的处理问题,越早保存的数据,记录的频次就会较高,即使不在是热点数据。这样就会导致新的缓存项永远无法保存的问题。
TinyLFU为了解决缓存频率信息记录空间的问题,在算法中认为数据访问15次就可以作为一个热点数据存在,而后按照位的方式进行统计(一个long数据类型可以保存64位的数据,可以统计16个数据),这样避免了传统Map实现统计频次的操作,节约了数据的体积。
针对新数据无法追加缓存的问题,TinyLFU中采用了一种“保持新鲜”的机制,当整体的统计数据达到一个顶峰数值后,所有记录的频率统计除2,解决了新数据与旧数据的缓存频次的公平问题。
W-TinyLFU算法
LRU算法的实现较为简单,但正对突发性的稀疏流量表现较好,可以适应热点数据的更替,但可能会造成缓存污染的问题(冷数据访问量激增然后再度变冷的情况)。
在W-TinyLFU算法中,将整个缓存区域分为两块,一块是Window缓存区(大小为当前缓存内存的1%),另一块为主缓存区(大小为当前缓存内存的99%),而后在主缓存区中又分为Protected区(大小为80%)和Probation区。
Window区域用于放新增加的缓存数据,可以解决稀疏流量的缓存加载问题,当Window填满后,会将其中的候选数据保存在Probation区域内,当Probation区域也满员后,会通过TinyLFU过滤器进行比对,保留有价值的候选数据,而无价值的数据则直接驱逐。
Spring Cache
简单介绍
在进行缓存实现时,Spring会考虑三种缓存的实现方案:JDK内置的缓存实现(ConcurrentHashMap)、第三方的缓存组件(EHCache、Caffeine)、分布式的缓存实现(Memcached、Redis)。
ConcurrentHashMap是JUC之中最为重要的部分之一,它可以在保证更新安全的前提下,提供良好的数据获取性能。
SpringCache之中为了便于缓存结构的管理,在org.springframework.cache包中提供了两个核心的标准接口,分别是:Cache实现接口、CacheManager管理接口。
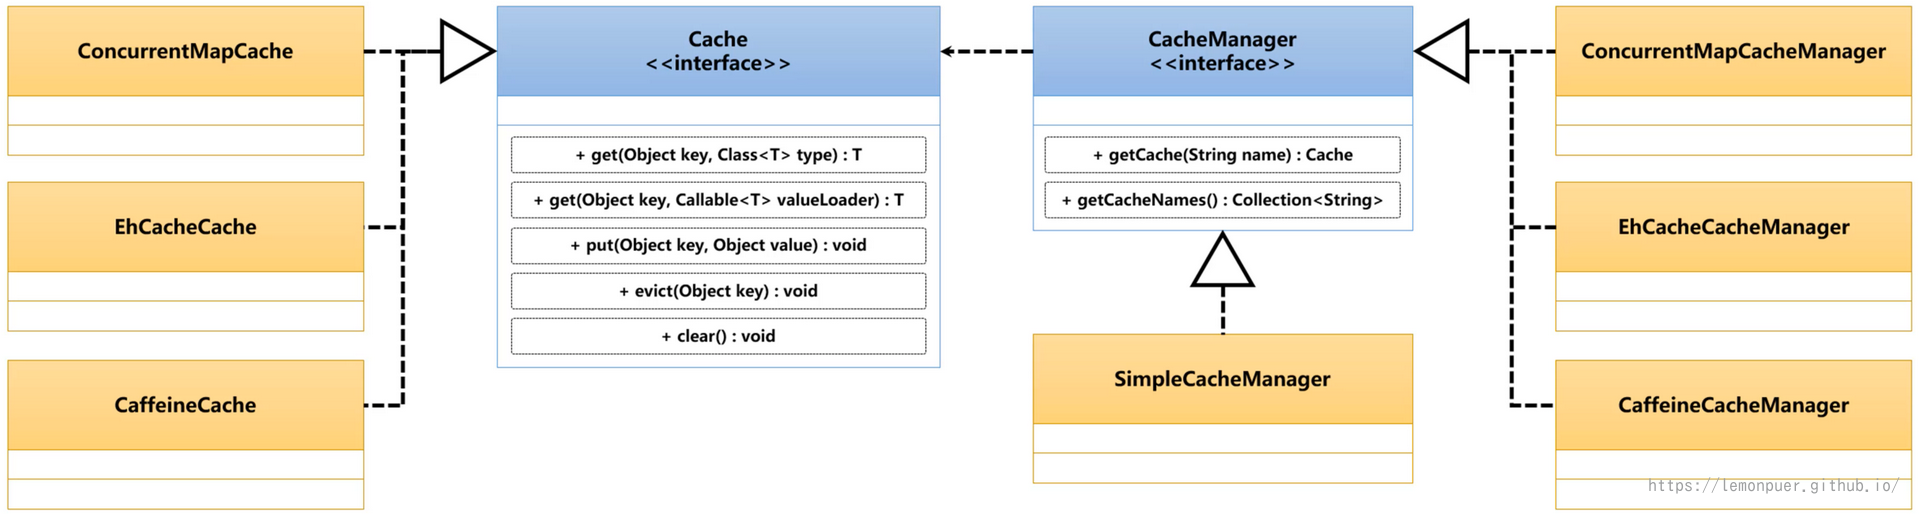
Cache接口规定了缓存数据的保存、增加、失效以及清空处理的操作功能,而要想获取到Cache接口的实例,那么就需要通过CacheManager接口方法完成,所有的Cache对象都在CacheManager之中保存。
在进行缓存实现的过程中,Spring是基于Cache接口提供的方法进行缓存操作的,所以不同的缓存组件如果要接入到Spring之中,需要提供Cache接口的具体实现类。考虑到缓存的管理问题,在Spring中又提供了CacheManager接口,所有可以在应用中使用的Cache类型全部在该接口之中进行配置。
Spring环境中Cache的默认实现类是ConcurrentMapCache,通过内置的ConcurrentHashMap属性实现缓存数据的存储。
1
2
| private final String name;
private final ConcurrentMap<Object, Object> store;
|
简单使用
创建配置类注入Bean对象:
1
2
3
4
5
6
7
8
9
10
11
12
| @Configuration
@EnableCaching
public class MySpringCacheConfig {
@Bean
public CacheManager myCacheManager() {
SimpleCacheManager simpleCacheManager = new SimpleCacheManager();
Set<Cache> set=new HashSet<>();
set.add(new ConcurrentMapCache("filledList"));
simpleCacheManager.setCaches(set);
return simpleCacheManager;
}
}
|
不创建CacheManager的bean对象也能正常使用
在service方法上标注@Cacheable注解:
1
2
3
4
5
6
7
| @Override
@Cacheable(cacheNames = "filledList", cacheManager = "myCacheManager")
public List<CoursesVO> filledList() {
List<Courses> courses = mapper.selectList(null);
List<CoursesVO> coursesVO = mapMapper.toVO(courses);
return coursesVO;
}
|
注意在接口的方法上使用@Cacheable注解是无效的
测试调用:
1
2
3
4
5
6
7
8
9
10
11
12
13
14
15
16
17
18
19
20
| @Slf4j
@RunWith(SpringRunner.class)
@SpringBootTest(classes = MapStructRun.class)
public class SpringCacheTest {
@Autowired
private CoursesService coursesService;
@Test
public void testCache() {
if (coursesService != null) {
List<CoursesVO> coursesVOS = null;
for (int i = 0; i < 3; i++) {
coursesVOS = coursesService.filledList();
}
log.info("coursesVOS:{}", coursesVOS);
} else {
log.info("coursesService is null");
}
}
}
|
只查询了一次数据库。
设置属性
| 属性 |
数据类型 |
描述 |
| value |
String[] |
定义缓存名称,可以配置多个缓存名称 |
| cacheNames |
String[] |
与value属性相同 |
| key |
String |
定义缓存KEY |
| keyGenerator |
String |
定义KEY生成器 |
| cacheManager |
String |
定义要使用的缓存管理器名称 |
| cacheResolver |
String |
定义缓存解析器 |
| condition |
String |
定义缓存应用条件,支持SpEL语法 |
| unless |
String |
定义缓存排除条件,支持SpEL语法 |
| sync |
boolean |
定义同步缓存,采用阻塞策略进行缓存更新 |
condition和unless是两个核心的配置属性,需要使用到特定的SpEL语法标记:
| 调用范围目标 |
位置 |
描述 |
| 当前调用的方法名称 |
root对象 |
#root.methodName |
| 当前执行的方法 |
root对象 |
#root.method.name |
| 当前执行的目标对象 |
root对象 |
#root.target |
| 当前执行目标对象所属类 |
root对象 |
#root.targetClass |
| 当前调用参数列表 |
root对象 |
#root.arg[0] |
| 当前方法调用使用的缓存列表 |
root对象 |
#root.caches[0].name |
| 当前调用方法参数 |
执行上下文 |
例如get(Emp vo),则 #vo.name |
| 方法执行的返回值 |
执行上下文 |
#result(#result.属性 表示返回的对象属性) |
整合Caffeine
修改配置类:
1
2
3
4
5
6
7
8
| @Bean
public CacheManager myCacheManager() {
CaffeineCacheManager cacheManager = new CaffeineCacheManager();
Caffeine<Object, Object> caffeine = Caffeine.newBuilder().initialCapacity(5).maximumSize(10)
.expireAfterAccess(5, TimeUnit.SECONDS);
cacheManager.setCaffeine(caffeine);
return cacheManager;
}
|
这里存在一个问题:CaffeineCacheManager不能正确导入,尽管导入了对应的依赖,甚至都可以直达目录,但就是导不了文件。
解决方案:
1
2
3
4
| <dependency>
<groupId>org.springframework</groupId>
<artifactId>spring-context-support</artifactId>
</dependency>
|
测试后确实可以设置缓存的过期时间,因为是直接将方法的返回结果作为缓存值,不存在异步更新。
另一种写法:
1
2
3
4
5
6
7
8
9
| @Bean
public CacheManager myCacheManager() {
SimpleCacheManager simpleCacheManager = new SimpleCacheManager();
Set<Cache> set = new HashSet<>();
set.add(new CaffeineCache("MyCache",Caffeine.newBuilder().initialCapacity(5)
.maximumSize(10).expireAfterAccess(5, TimeUnit.SECONDS).build()));
simpleCacheManager.setCaches(set);
return simpleCacheManager;
}
|
当然,作为Spring家族的一员,也可以通过配置文件的形式配置:
1
2
3
4
5
6
7
8
9
10
| spring:
datasource:
driver-class-name: com.mysql.cj.jdbc.Driver
url: jdbc:mysql://192.168.124.101/test
username: root
password: 123456
cache:
type: caffeine
caffeine:
spec: initialCapacity=5,maximumSize=10,expireAfterAccess=5s
|
更新缓存
前面使用caffeine设置缓存的更新时间和业务的相关性不大。
SpringCache 中提供了数据的更新操作,而且这种更新操作与业务直接相关。
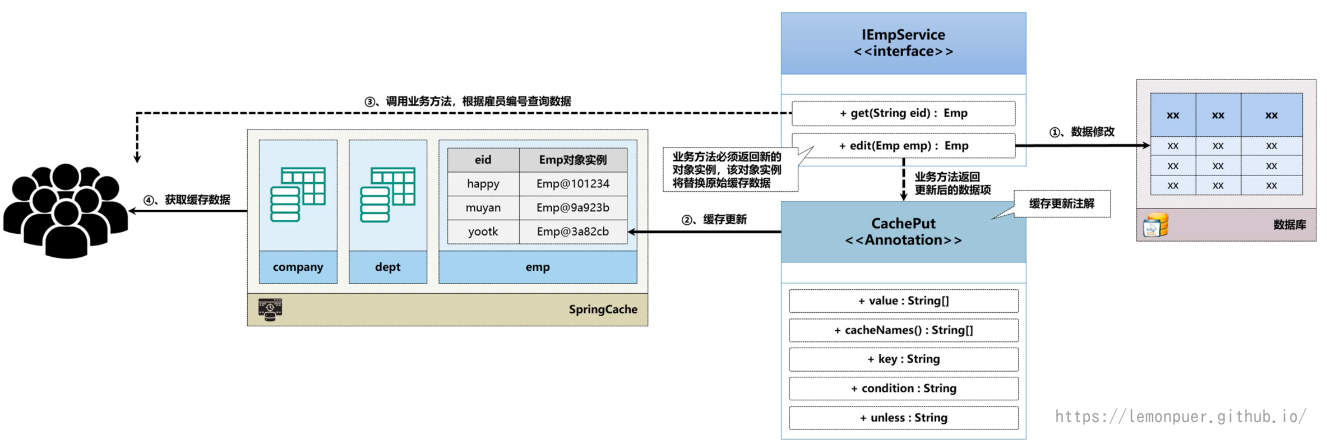
如上图所述,当我们执行更新操作时,返回的对象实例会直接作为新的缓存。
1
2
3
4
5
6
7
8
9
10
11
12
13
| @Override
@Cacheable(cacheNames = "filledById", key = "#id", unless = "#result==null", cacheManager = "myCacheManager")
public CoursesVO findById(Long id) {
Courses courses = mapper.selectById(id);
return mapMapper.toVO(courses);
}
@Override
@CachePut(cacheNames = {"filledById"}, key = "#id", cacheManager = "myCacheManager")
public CoursesVO update(CoursesVO coursesVO) {
mapper.updateById(mapMapper.toEntity(coursesVO));
return mapMapper.toVO(mapper.selectById(coursesVO.getId()));
}
|
可以使用@CacheConfig注解统一整个类中的cacheManager
感觉这种方式有点鸡肋,一般更新不会再进行查询,这种方式有点类似将缓存的查询前置到上一次更新了。
或者说前端直接将整个VO传过来,更新后可以直接返回VO。
不推荐使用,容易造成数据不一致的问题,比如之前查询所有课程列表的缓存就还是旧数据。
删除缓存
删除缓存还是很实用的,比如当我们进行更新或删除,可以将对应的某些查询方法的缓存进行删除。
1
2
3
4
5
6
| @Override
@CacheEvict(cacheNames = {"filledById","filledList"}, key = "#coursesVO.id", allEntries = true)
public void update(CoursesVO coursesVO) {
mapper.updateById(mapMapper.toEntity(coursesVO));
}
|
allEntries = true 表示删除指定缓存中的所有条目,不管key是何值。
但是测试发现不能满足要求,filledById缓存只想删除指定id的数据,我们可以使用@Caching注解:
1
2
3
4
5
6
7
8
9
10
11
| @Override
@Caching(
evict = {
@CacheEvict(cacheNames = "filledById", key = "#coursesVO.id"),
@CacheEvict(cacheNames = "filledList", allEntries = true)
}
)
public void update(CoursesVO coursesVO) {
mapper.updateById(mapMapper.toEntity(coursesVO));
}
|
整合Redis
1
2
3
4
| <dependency>
<groupId>org.springframework.boot</groupId>
<artifactId>spring-boot-starter-data-redis</artifactId>
</dependency>
|
创建模板并配置对应的CacheManager
1
2
3
4
5
6
7
8
9
10
11
12
13
14
15
16
17
18
19
20
21
22
23
24
| @Bean
public RedisTemplate<String, Object> myTemplate(@Autowired LettuceConnectionFactory factory) {
RedisTemplate<String, Object> myTemplate = new RedisTemplate<>();
myTemplate.setConnectionFactory(factory);
myTemplate.setKeySerializer(RedisSerializer.string());
myTemplate.setValueSerializer(RedisSerializer.json());
myTemplate.setHashKeySerializer(RedisSerializer.string());
myTemplate.setHashValueSerializer(RedisSerializer.json());
return myTemplate;
}
@Autowired
private RedisTemplate<String, Object> myRedisTemplate;
@Bean
public CacheManager myCacheManager() {
RedisCacheWriter redisCacheWriter = RedisCacheWriter.nonLockingRedisCacheWriter(myRedisTemplate.getConnectionFactory());
RedisCacheConfiguration redisCacheConfiguration = RedisCacheConfiguration.defaultCacheConfig()
.serializeValuesWith(RedisSerializationContext.SerializationPair.fromSerializer(myRedisTemplate.getValueSerializer()))
.entryTtl(Duration.ofSeconds(60));
return new RedisCacheManager(redisCacheWriter, redisCacheConfiguration);
}
|
序列化
为什么要考虑Redis的序列化:
默认的序列化形式按顺序保存所有的非 static 非 transient字段。
但是,这样保存的数据中有许多并非实际有效的信息,比如集合框架中的modCount,它是用来检查是否发生了并发修改的;比如 ArrayList 中,可能内部数组实际长度是50,而已使用可能是15。如果把整个数组全部序列化,是很浪费的。所以序列化时候要考虑这个问题,只序列化有效的部分。
总的来说,默认的序列化一般存在以下缺点:
- 消耗更多空间
- 消耗更多时间
序列化的逻辑并不了解对象本身的逻辑,它只能沿着默认的途径去遍历。过多并不需要的数据也就意味着需要更多的遍历过程。
- 可能造成栈溢出
因为序列化和反序列化是一个方法调用。对于List 等,原来的添加是分批次添加的,也可能一个个添加。如果把它放在一个默认的序列化方法中,在一个方法中执行过多的遍历,可能引起栈溢出。
建议
无论是否默认的序列化方法,主动声明 serialVersionUID。
- 避免因为 uid 问题导致的不兼容,当 uid不同时,反序列化会报异常失败。
- 性能有所提升:如果没有声明 uid ,jvm 会在序列化时,自动计算出一个 uid
如果类发生了任何一点变化,可能uid 都会不同,导致反序列化时出错;所以,如果不声明 uid ,就会导致可能一个小小的无关的变动,都会导致序列化不兼容